Posted on Leave a comment

The Next Evolution – System IX and The System X

THE NEXT STEP

System IX

In 2005 after 35 years of combined experience in repairing all of the earlier systems of saddles. Eldorado Saddle and Tack along with Hill View Farms came up with a better panel design.

Added to the rear mounts are stainless steel slides, making the panels virtually maintenance free. Which is added to the already proven System VII panel.

However, the rivets are of copper for better strength and performance than the aluminum used in the System V and VII, and the mounts are of steel.

So radical was the improvement in 2005 on performance of the preexisting System VII, that the 7E easy slide, as it was referred to during the experimental year of testing.

It needed to be in a category by itself, thus the System IX was born.  Eldorado Saddle and Tack calls this line by a variety of names, Amera-Flex, Ameri-flex, 7E, Easy Slide and Eldorado saddles

THE NEXT EVOLUTION

System X.

During the year 2007, when the Delrin panels alone were maximizing performance in earlier systems.  Several small but significant innovations made big changes in the overall panel performance, durability and fit.

Based on the System VII design and the slide plate of the System IX, the System X has taken the features of these making this the best design yet.

However this system must have a saddle tree that is equal in design function for the panels to perform exquisitely.

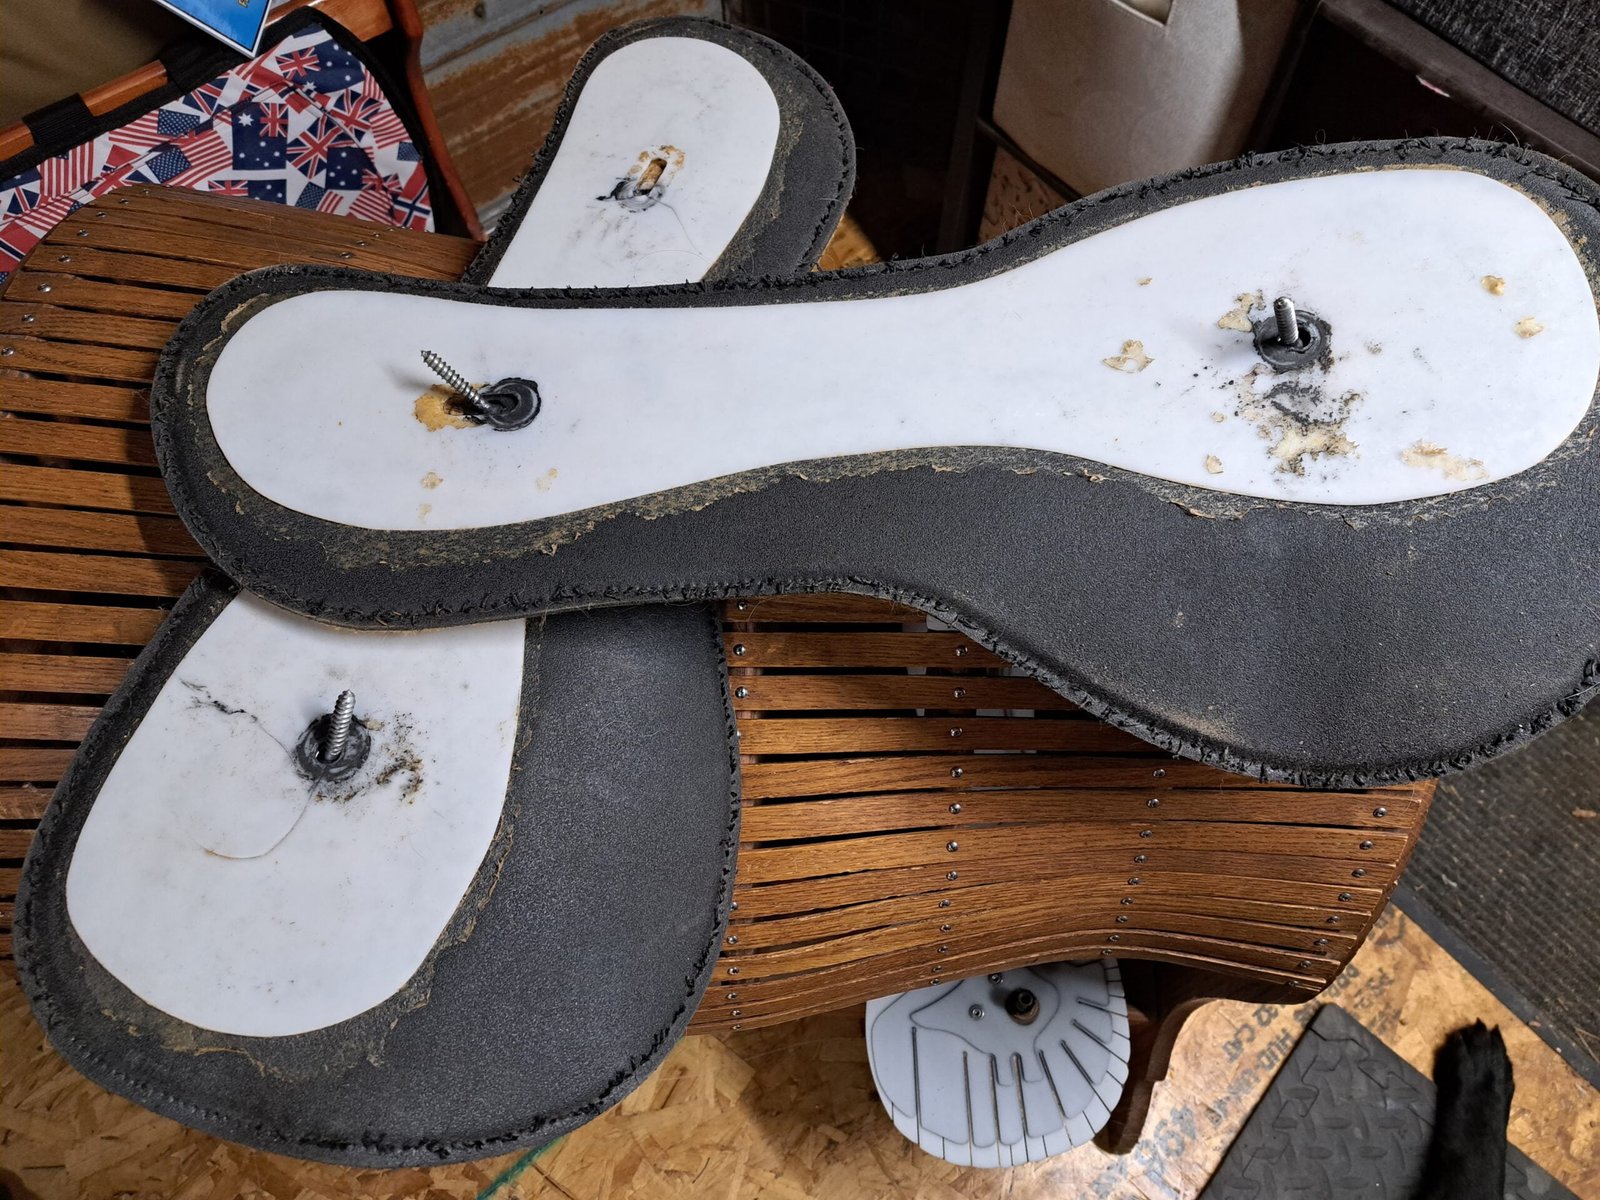
The first of several changes to the panels are the rivets. 

Gone are the copper and aluminum that were once used in the layering assembly of the panels. 

Instead, there are stainless steel rivets that eliminate the work-hardening seen with earlier systems.  This fatigue resulted in pressure points on the horse.

Another improvement, the new pivot mechanism, eliminating premature ware.  With the advancements in machining Evolutionary Saddles has achieved a true ball-in-socket action.

By using different radii on the insert and the washer, this ball-in-socket joint performs with pure fluidity.  Providing maximum panel movement with closer contact. 

The clicking and popping noise once heard during the break in period of earlier systems has been virtually eliminated in this newest System X.

The Foam Backer Layer

Another hindrance in panel flexibility has been the backer and foam layer of padding used on the underside of all earlier systems. 

This padding is what cushions the semi-rigid Delrin material and the mechanical hardware used in the assembly process. Preventing direct contact with the horses back as well as eliminating the pressure ridges that occurred when inferior materials or assembly is used. 

This improved backing is fingered to match the finger cuts in the Delrin panel itself.

Having this padding match the fingers allows for the little subtleties on a horse’s or mule’s shoulder, back and wither conformation.  Especially if he has an unusual or highly pronounced scapula.

On earlier systems the panels tended to fall into the dip or hollow behind the shoulder.  This creates excessive pressure from the overall rigidness of the front of the panel, especially in the western saddles.

These small differences have made such a dramatic an improvement in the overall function of the panels.  Eliminating the dreaded breakdown of the attachment points of panel to tree which in time could possibly create uneven pressure.

Take it to the Horse

With the time, dedication and field testing starting in 1986 Evolutionary Saddles is proud to introduce this new system.

The System X is not likely to be knocked off, as the technical inputs are high and the return on investment is low.

The System X delivers a performance difference, as if you had been playing the piano with mittens and then graduated to gloves.

Where is the Flexible Panel Saddle Today?

Posted on Leave a comment

Systems VI thru VIII

MODIFIED EXTRAS & VARIATIONS THAT IS WHAT SYSTEMS VI THRU VIII HAVE BEEN.

System VI or Mock 6and the later System VIII or Mock 8 by the Ortho-flex Saddle Works Company.

This system took the rivets out of the fingers of the Original Ortho-Flex System III.  Then replaced this design with a flower petal pattern in both the front and sometimes rear of the panel, resembling a 7-leaf clover.

This pattern was first conceived in the Free and Easy saddle and then copied by the Ortho-Flex Saddle Works Company.  Then bought the original Ortho-Flex Saddle Co. and the rights to use the “Ortho-Flex” ® trademark name. 

Len brown did not stop making saddles because he did not believe in the system, he simply lost his company due to poor management.

This design is also added to the rear of the panel, and offered on select saddle models as an upgraded feature.  This design can be used alone in a single layer Delrin or is used conjunction with a multi-layer panel. 

Regardless how many names of “systems” come from this single design is it all the same concept, just sliced up to make it appear as if there is more.

THE ULTIMATE

System V American Saddles-Grb (Patent in Germany only 3/9/2001-Europe # EP1292316A2)

Represents another step forward in flexible panel construction. This new construction that improves upon principles seen in its predecessors.  It offers solutions to problems occasionally associated with other systems.

Due to the uniqueness of this system and its high performance, it is currently patented, and copies no other.

Construction was changed in the front of the front of the panel.

The front of the panel is made of three layers, with 15 separate fingers, with no rivets holding them together.

In the first layer, which is mounted 5″ from the front edge of the panel, providing an even softer fit in the shoulder.  This allows complete freedom in the shoulder’s rotation.

This construction extends to the area of the withers so even extremely high and wide withers are afforded complete freedom.

This is covered by the second layer with six fingers, overlapping the first, enabling an automatic and equal distribution of weight along the entire length of the panel.  Including the middle section, preventing the so-called “bridge-fit”.

After that comes a third layer with no fingers. When put together every layer is smaller than the layer before, which is part of the progressive loading from the mount to the panel.

Construction was also changed in the rear.

This design has also three multi-layer construction.  The second layer resembles that of two fingers flowing towards the center of the panel.  This design ensures optimal weight distribution, into and including the middle of the panel.

This special design, using various sizes and thickness of Delrin, has been computer-calculated and curved.  Insuring that this system gives optimal distribution of weight along the entire length of the panel. 

Now even when your horse is in motion, bending and flexing, regardless of your horse’s shoulder width, height, holes and dips behind the shoulder and back. 

You and your horse will be able to move in supreme comfort and freedom. 

The mounts and hardware used are of steel.  The rivets used in the layering of the Delrin sheets are of aluminum. They call their saddle line American-Flex.

THE TECHNOLOGY CONTINUES

System VII (based on System V)

American Saddles continued their quest for perfection. Research tests made possible an addition, of more cuts, feathering in the top area along the spinal processes of the withers, with a more rounded front.

This made it more comfortable for those horses who have extremely high razor withers, and also for horses who have broad and wide withers.

It will even fit those horses with “heart-shaped” backs where you can roll a marble down their spine.

Overwhelming success during 2002 confirmed what computer scans recommended. Horses and riders are thrilled with the panel’s success.

COMBINATIONS

System VIII or Mock 8 

Saddle Works Ortho-Flex combined the single layer System I with the finger cuts of the System III, by cutting short the front of the panel.  All done in order to address the issue of excessive pressure at the mounting points in the saddle. 

This really does not qualify as new system but modifies preexisting ones. 

However, they are calling this combination System VIII, which still requires great care in fitting.  Due to the horses shape, the correct saddle tree is necessary in order to achieve an acceptable fit.

A New Development – The System IX & The System X

Posted on Leave a comment

The System III and System IV

The System III and System IV were good evolutions that needed to be taken a step further.  Their contribution to later Systems was invaluable. 

THE EXTRA: System III

In the quest for further progress, the Original Ortho-Flex developed this panel. It was designed to address fitting the most difficult horses to saddle; those with very pronounced shoulders, or mutton-withered and broad.

That difficult conformation is often exaggerated by a short back or croup-high conformation. It’s also seen some in warm-bloods. (For history, the “original” System III is patented as part of system or mock II (2/18/1994 -USA), and was based on three mountings, on either side of the saddle bars, allowing the panel to slide.

Ortho-Flex Saddle Company never built this system because it did not work. So there are no laws or patents to protect the current System III.

This system was then modified based on the System II with a refinement in the front part of the panel; it looks like a giant hand with five fingers. These fingers allow the panel to conform itself even more closely to the shape and motion of the shoulder, thus offering more freedom of movement.

Two results of this new construction is that it was only offered as an expensive option on some saddle models, and the use of rivets to stabilize the five fingers resulted in excessive stress which causes the fingers to either crack or break.

THE ADJUSTABLE: System IV

Pro-adjustable, tied into the extra system III patent, could be regarded as a high-tech breakthrough in flexible panel systems. The height of the panel mounting points can be adjusted quickly and easily with the use of an Allen wrench. 

Allowing the user to optimally balance the saddle and the rider, even on a horse with truly unusual conformational challenges.

THE LICENSE

This license from the Original Ortho-Flex Saddle Co. was sold to “Rocking R” who then changed their name to Timberline.  Then was sold to K-B Saddle Shop – who kept the name.

SK Saddle, Watson Brothers Saddles (former Rocking R) for a time sold out to Ozark Mountain Saddles.  Since then have terminated relations with Richard Watson and the Saddle Ranch.

This system is a hybrid of Ortho-Flex Systems I and II. Those saddle companies do not utilize the System II mounting method. But rather offer the track system at the back of the panel.

Like System I, they are also built on a single layer of Delrin, but thicker (1.25 vs the .093) allowing for rider support.

The saddletree selection is crucial to the panel and tree configuration.  As is the choice of thicker Delrin enables this system to perform nicely.

The panels are also capable of some flexing in the middle, although not to the degree that the higher systems offer.

This saddle construction, like the System I, is more like a saddle with a flexible panel, than a real system.

Due to the adjustable rigging, the saddle can be positioned to compensate for this difference most of the time.  This allows it to be fitted relatively well to a wide range of back types.

THE VARIATIONS

The Ultra Flex, Oakfield, Ultra-Flex Vario, Ultra-Flex Adjuster, Reactor Panel Saddle and lastly the Free & Easy Saddles all have a multi-layered Delrin panel. 

Some have removable and or adjustable mounting spots to adjust for the limitations.  Both in the panel and the tree design when fitting the saddle to the horse’s shoulder and back.

Great skill and knowledge is required to achieve a good fit, because these panels are not truly self-adjusting.

The Story Continues – System VII thru System VII

Posted on Leave a comment

System II – The Next Mounting System

The System II or Mock II Patent (8/15/1991-USA) began in 1990.

The Original Ortho-Flex developed a breakthrough in the existing technology. 

The System II offers a new mounting system for the panels, allowing the panels to conform to all three dimensions of motion dynamics.  Providing an automatic fit, not only in the shoulder rotation, but also along the back.

The rear of the panels are mounted in a track that enables the entire panel to conform to a radical range of back contours.

This addition of the sliding mount at the rear, the panels actually push down and away from the center of the tree.  With the right force that enables the entire panel to conform to a radical range of backs. 

Most importantly, they allow the panels to conform to the horse while the horse is motion, independent of the tree.

The System II, the panels are away from the tree about 1/8″ to 3/8″ on steel rocker spacer mountings.

The Layering

The construction of these panels is 3 layers of Delrin at the mounting.  Each one is successively smaller, creating what is termed as “progressive loading”.

This makes pressure points virtually impossible directly under these rocker spacers.  Mounting the front mounts 4.5 inches back from the front edge of the panel allows for scapula rotation.

In addition to its other advantages, System II can rise or sink with the back.  Then became the flagship system for the Original Ortho-Flex Saddle Co.

After the Buyout

Following the buyout of the Original Ortho-Flex Saddle Company by Saddle Works Saddle Company, they made a change to the mounting.  

The panels are now mounted only 2.25 inches in from the front of edge of the panel.  This stiffens up the panels in the shoulder area inhibiting the shoulder’s range of motion.

Next: The Extra, Adjustable and the License – System III and System IV

Posted on Leave a comment

Delrin Panels Available Worldwide

System I

Delrin® Panels are available for saddle makers worldwide to use on their saddles! Developed by the NASA space program, Delrin ®  is used throughout all aviation aircraft and in the medical field.

The Original Ortho-Flex ® Saddle Company developed the panels using the Delrin sheets, which were the heart and soul of Ortho-Flex.

Don’t Be Misled

There are many companies that use the word “flex” in their marketing to sell their saddles. 

Make sure you are getting the Delrin® panel and not some facsimile of “flex”, “panel”, rubber or rawhide.  Some even have wood or plastic bars that are hinged on the fork and cantle.

A horse’s shoulders and back move with every step.  The “flex” needs to move as quickly and as freely in all directions, while distributing the rider’s weight evenly.

Delrin® material is such a product. It will not fatigue, misshape or wear out easily, and will last over years of riding. 

One critical point to remember when buying a saddle is that the basic saddletree itself must be straight, not handmade.  The CNC machines that make these saddletrees are key in the function of your saddle.

I’ve put together a retrospective look at the different types of flexible panels as they evolved starting in 1982 and those offered to date.  I wanted to better illustrate the progress in technology represented by various saddle makers.

We begin with the foundation technology, from the Original Ortho-Flex 1 System.  This original system  subsequently led to Systems II, III, IV, V, VI VII, VIII, IX, and X with the variations and extras.

What is Delrin® 

Early in 1950 research director and chemists Frank C McGrew developed a tough and heat resistant material he called “synthetic stone.” 

Delrin ® (Polyoxymethylene) is an acetal homopolymer resin that is a durable lightweight crystalline plastic.

During the years of development, which involved a patent dispute, DuPont patented Delrin® in 1956. 

It has an excellent balance of desirable properties that bridge the gap between metals and ordinary plastics.

Delrin® has memory, that allows it to return to its natural shape. This is imperative for the horse so that the panel is never stuck in any one flex. 

With a unique combination of strength, stiffness, tensile strength, and hardness.  Coupled with the dimensional stability, fatigue resistance, solvent and fuel resistance.  Not to mention the abrasion resistance, low wear, low friction, with high fatigue endurance, corrosion resistance and mechanical resilience.

These outstanding characteristics of Delrin® make it popular for its versatility.

With a broad use in industry applications, such as automotive, aerospace, electrical and medical applications. 

The First Delrin Saddle Panel

The System I or Mock I patent (6/26/1986-USA)

The original system used when the Brown Performance Saddle Company started in 1982.

Len Brown then incorporated his business and the Ortho-Flex Saddle Co. came into existence in 1986. This is the first and oldest system developed by the Original Ortho-Flex, and marks the beginning of the Ortho-Flex story.

This relatively simple system, with one layer of Delrin in the panel. System I is capable of allowing enough room for shoulder rotation and fits a wide range of back types.

However, it is not fully capable of following the full range of motion along the back.  It cannot sink or rise in the middle, for example, as the panels are not fully independent of the saddletree.

It is therefore necessary with System I to pay attention to the type of tree relative to the type of back, and is not as “user-friendly” as the systems to follow.

The Ortho-flex saddle with System I panels is still regarded as a flexible panel saddle.

As is the flexible panel system in later evolutions that is fully independent of the saddletree.

Made of a single .093 inch of Delrin, the panels were attached to the tree about 6″ inwards from the ends of the bars.  On top of that the panels were 1 ½” longer than the successor, System II.

Creating longer skirts, not ideal for short backed or deep backed horses.

The panels were mounted with a wood screw and washer into the tree. The system had a few advantages, being less expensive to build, and a little easier to mount the panels.  

This system was eventually replaced by System II.  Since it did not allow the panels to flex downward in the middle with the horse’s back. 

Requiring the panel stiffness to be adjusted to compensate for the increased rider’s weight.

Tree shape was also critical for the system to function so custom fitting through tree changes was often necessary.

The System I was a vast improvement over the traditional saddle in weight-bearing area.  Although it required a tree shape not adaptable to all types of riding.

In the next installment we’ll go over the System II – “The Successor – A New Mounting System”

Posted on Leave a comment

Why My Saddle with The System X?

Did you know that 80-90% of horses experience back problems?

Many riders assume these issues come from poor riding posture, but the biggest culprit is often the saddle itself—an ill-fitting saddle can cause discomfort, pressure points, and long-term physical damage to both horse and rider.

Unfortunately, many horses suffer in silence. As natural prey animals, they are conditioned to tolerate discomfort. But just because they endure it doesn’t mean they should have to.

Recognizing Saddle Pressure: It Starts Before You See the Signs

Many riders believe saddle pressure issues show up as white hairs, swelling, edema, or dry spots—but by the time these visible signs appear, the damage is already well underway.

Instead, the earliest indicators of saddle discomfort are found in your horse’s behavior. The key to catching problems before they become serious is palpation—physically checking your horse’s back for tenderness before and after riding.

This hands-on method is:
More accurate than computer-generated saddle fit measurements.
Immediate—you can check your horse right now, no fancy tools required.
Cost-effective—it doesn’t require expensive diagnostic equipment.

To get the best results, palpate your horse:
📌 Before riding – Establish a baseline.
📌 Immediately after riding – Look for sensitivity or soreness.
📌 48 hours later – Just like humans feel soreness two days after a tough workout, horses experience delayed-onset muscle pain too.

👉 Want to see palpation in action? Check out my YouTube Playlist “Palpating Your Horse” for a step-by-step guide.

The Truth About Saddle Pads & Shims

Many riders turn to pads and shims to “fix” saddle pressure issues. While these solutions can provide short-term relief, they don’t eliminate the underlying problem—an ill-fitting saddle.

Instead of spending hundreds of dollars on temporary fixes, a System X saddle helps distribute pressure evenly across your horse’s back, reducing the need for additional padding.

How Does a Horse’s Back Move?

To understand why conventional saddles create pressure points, let’s look at how a horse moves:

🐎 Standing still: A horse’s back has a slight arch. A rigid saddle can “bridge,” leaving a gap in the center and causing pressure at the front and back.
🐎 Turning: One side of the horse’s body shortens while the other stretches. A conventional saddle can’t adapt, increasing pressure on one side.
🐎 Lowered head / downhill movement: The spine flattens, shifting pressure to the front of a rigid saddle.

The result? A conventional saddle will always create pressure points—it’s just a matter of when and where.

Why System X Saddles Make a Difference

System X technology allows the saddle to move and flex with the horse’s back, rather than working against it. Unlike rigid saddles that lock the horse into a fixed shape, System X panels adjust dynamically to distribute weight evenly.

To illustrate the difference, think about a metal-frame hiking backpack:

🎒 If it’s too small or too big, it rubs, creates pressure points, and causes discomfort—even injury.
🎒 Now imagine running, jumping, and climbing hills with it on—that’s what a horse experiences with an ill-fitting saddle.

You can test your own saddle fit by sliding your hand under it (without extra pads) and checking the front, center, and rear:
👉 Without a rider, do you feel gaps or pressure points?
👉 With a rider, do you feel pinching?

What your fingers feel in that moment is what your horse feels for the entire ride.

One-Size-Fits-All? Not for Saddles.

Horses come in an endless variety of shapes and sizes—yet most conventional saddles rely on 8-15 standard tree patterns. Look at any pasture, even within a single breed, and you’ll see massive variations in:
✅ Shoulder width
✅ Wither height
✅ Back length and shape
✅ Croup angle

Can a factory-made saddle truly accommodate all of this?

A System X saddle is designed to adapt to your horse’s changing shape, giving them the freedom of movement they need—without pressure points.


The Bottom Line: Change the Saddle, Not the Horse.

Horses are incredible athletes, constantly growing and changing. A saddle should move with them, not force them into a rigid shape.

If your horse has been showing signs of discomfort, it might be time to consider a better-fitting solution.

Want to learn more? Check out Are there Options? to explore the next step in saddle fit solutions.

Photo courtesy of Carlee Strack

Posted on Leave a comment

Are there Options?

I have been there, wondering what are the options and how much am I going to have to spend on a saddle?  How long will it fit before I am on the search again?  What if it doesn’t fit me too?

How can the traditional saddling industry, cover all the variations of shape of our horses? Not to mention riders?! Truth is, they can’t.

At best, they offer only a handful of saddle tree patterns to choose from, then you and your horse must conform to those few choices. That is like saying that you must only select a pair of pants to wear from only 4 sizes.

Now that we have established the fundamental variation in horse backs, we still have the problem of how the shape of a horse changes with movement.

Finally, the same horse is continuously changing over the course of its life! As the result of growth, aging, training, conditioning, feeding, etc. its contours are constantly evolving.

This last point alone means you need to alter a production saddle or acquire a new saddle every six to twelve times over the course of a horse’s life. An investment for sure.

If all of this wasn’t bad enough, another structural problem now arises, the pressure load on the horse’s body resulting from the rider’s weight.

What does all that do to the horse?

As we know, excessive pressure damages the hair, skin and all of the tissues underneath.  That is where the dry spots, white hairs and sometimes even open sores can occur, all from pressure. 

Let’s take a look for example at an English saddle.  An average English saddle has a supporting surface on the horse’s body of approximately 27 square inches. Then, we put another 165 lbs onto the saddle – the rider.

This gives us a load of 39 oz. per square inch. Acceleration, gravitation, etc. may at least double this value during movement, producing a load of 78 oz. per square inch.

Let’s repeat this calculation with a western saddle. An average western saddle has a supporting surface of 96 sq in. 

Let’s take our 165 lb rider again, giving us a load of 28 oz. per square inch or 55 oz. per square inch during movement.

These values are valid for contact over 100% of the supporting area. As we know however, the horse alters its shape during movement, making this 100% completely impossible to attain.

Even if you add at least 1/4 to the load, your calculations will still be very much skewed in favor of the saddle. Now, think back to that 24 oz limit once again.

So for review, any activity that involves concussion (jumping, posting, etc.,) will effectively double or even triple the rider’s weight.

What is that doing to our pound per square inch?

Are we causing damage?

The only way to know is by palpation. You can see a video how to palpate your horse!

What are the options?

Is a flexible saddle tree an option?

This was out of the question, since it would not solve the basic problems of fitting the horse AND providing a stable seat for the rider.

It should not be like sitting on a sponge. But that would be the logical consequence if the saddle tree were to actually follow the horse’s movement.

Another effect would be a sagging of the tree, which would in turn concentrate the weight on certain points especially the spine The final point against the flexible tree was that it would not have a large enough supporting surface to meet our – or rather the horse’s – needs.

An adjustable saddle (bars & gullet)? Well yes, not such a bad idea but here again it would still be subject to the basic constraints of fitting it to the horse.

Also, any adjustment reaches a limit at some point, not to mention that in this case the “normal rider” is always dependent on assistance from others (saddle dealers). In addition, we did not want something that is calibrated but something that changes continuously.

First, because there are almost infinite variations among horses, but also because these variations are gradual and not divided into standardized sizes.

These comments also apply of course to these interesting variations of “saddle systems” that work with individually added padding.

The Option of Custom made saddles?

On the basis of all these considerations, we rejected the idea of custom made saddles from the beginning. Even a custom-made saddle can only, in the best-case scenario, fit the horse 100% in a standing position, and then only with respect to the horse’s present state.

A treeless saddle? 

Also not such a great idea. With this, there is no need to take the traditional fit parameters into account. But there remains the problem of uneven, selective weight distribution.

And the added problem of the pressure load on the spiny processes, because a treeless “saddle” cannot keep this area clear.

Which is what makes the treeless saddle not the ideal to fit both horse and rider.  Although a better option than saddle that doesn’t fit at all on a horse where a treeless at least allows them to move in some comfort. 

Independence between fit for rider and fit for the horse!

A saddle in which the supporting surface is independent of the saddle tree, conforms to the widest variety of horses, then able to adapt to the horse during movement. Additionally is large enough to distribute the weight over an area that is more than sufficient.

Thus the purpose of a saddle. To offer the rider support while distributing the rider’s weight over a large surface area.

This was the beginning of the various systems that revolutionized the panel saddle.

With the System X there is a strong, inflexible tree as a “chassis” to give the rider the desired stability. Mounts are attached to this tree to connect it to the panels.

These mounts are shaped to allow the panel to move in all three dimensions (up, down, side-to-side)– independently of the tree! In order to guarantee that the weight is distributed over the whole panel, we have chosen a material that is very smooth and flexible – Delrin.

At the same time, it is strong enough to distribute the force over the entire surface. This was very important, because only in this way will it work as a whole.

Of course, there are many saddles “out there” that resemble these panels, where the panels give way in the front and behind, but they are not really able to actually distribute the weight.

All other saddles – whether flexible or traditional – have one thing in common: you ride these saddles on the bars of the saddle tree, which is the source of the problems.

Finally, let us repeat the calculations we have just done of the load per square centimeter [inch] on the horse’s back.

Our saddles have an average supporting area of 324 sq. in. This means that the calculations result in values of 20-40 oz. per sq. in.

And since our panels join in the movement, we don’t need to make any reductions in the supporting surface. We are obviously far below the 105-gram limit.

As you can see it is actually quite easy to build a saddle that is truly horse friendly.

Photo courtesy of Carlee Strack

Posted on Leave a comment

How to Saddle with a Flexible Panel Saddle

I am contacted almost everyday from folks that have picked up a pre-owned flexible panel saddle and have trouble their first time out with the saddle.

Sometimes this has to do with fit or functionality of the panels, but most of the time it has to do with placement of the saddle on the horse’s back.  

Because so many people have requested help with fitting a flexible panel saddle, I decided to dedicate an article to the subject. 

Sox vs a Pad or Rug

Rule number one, never use a pad or rug that is over ½ inch thick under any flexible panel saddle.  A thicker pad will prevent the panels from functioning.

Rule number two, when using anything other than Sox or Booties on a panel saddle you must tent the entire spine by pulling the pad or rug up into the spine of the saddle, from the front to the rear.

For optimal performance Sox or Booties are the best choice. Since Sox and Booties attach to each panel individually there is never any pad to mess with.  

You just saddle up. This will make you the envy of your riding friends as you saddle up in half the time. 

Saddle Placement

Saddle placement is where the first mistakes are made.  When you look at a panel saddle you need to ignore the panels.  

With a rigid tree saddle you place the front of the saddle bar 2-3 fingers behind the scapula. Think of the point at the swell base on a panel saddle as the front of the bar of a rigid tree saddle.  It is from there that you apply that 2-3 finger measurement. 

This will cause the panel to overlap the scapula by up to three inches. That is OK, because fingers are cut into the front of the panel that will allow that scapula full freedom of movement.

After placing the saddle, step back and make sure the saddle is level from swell/pommel to cantle.  If it is not level, then the placement is off or you may need shims.  (There are some extreme exceptions, but those are special cases.)

Cinching or Girthing up

Once the saddle is placed in the right spot and the top is level, it’s time to check and  adjust the rigging so that the girth or cinch will fall along the heart girth area on that horse. 

When adjusting the crossfire rigging, be sure that the tension is the same on both straps that attach to the saddle. If the tension is not even in the rigging straps it will cause an unstable feeling when riding. 

Rule number three when cinching/girthing up NEVER use one that has elastic attached to the buckles. Elastic cinches/girths will cause the saddle to ride like a car without shocks because the panels provide the give that the elastic would be providing to a rigid tree saddle.

So how tight do you tighten a saddle like this? 

My best description is you tighten like you always have and then just a lil bit more. Basically, you are over tightening a little bit. Once in the saddle, reach down and feel the difference. You’ll notice that the cinch or girth is not as tight as it was, that’s the flex of the panel.

 While saddling this type of saddle is different, it really isn’t that different from what you were taught, so don’t let it overwhelm you.

As always, if you have any questions never hesitate to contact me!

Or reach out to me on Facebook or Instagram

Photo courtesy of Carlee Strack

Posted on Leave a comment

Saddler’s Bloom or Mold?

What’s that white substance on my leather tack?

Upon encountering the white residue on saddles and tack, individuals often jump to the conclusion that it’s the notorious culprit of the leather world – mold.

However, the white substance you’re observing is likely not mold; it’s more accurately identified as Leather Bloom, Leather Spew, or Saddlers Bloom.

This whitish residue can manifest as either a powdery substance or even take on a waxy texture, its appearance contingent on the type of bloom occurring.

Is this bloom detrimental to my tack?

Fortunately, leather bloom is primarily a cosmetic issue and can be effortlessly eliminated by gently buffing it with a soft cloth or a horsehair shoeshine brush.

What brings about leather bloom?

From my personal experience and research, cold temperatures and low humidity emerge as primary catalysts for leather bloom. Even a meticulously cleaned, oiled, and conditioned saddle can develop bloom when placed in a cooler environment.

During the tanning process, hides are infused with fats, oils, and waxes, which sets the stage for certain types of leather to be more prone to blooming over time.

Every saddle has its distinctive character, reflecting the individuality of the leather derived from unique animals.

It’s important to note that bloom does not impair the functionality of the affected items. The optimal storage for saddles and leather goods involves a warm, dry location, ideally staying below 75 degrees Fahrenheit.

Mold, however, poses a much graver threat. If unchecked, it can wreak havoc on your leather tack, consuming the fats and oils present in the material.

What’s responsible for mold growth?

Like most fungi, mold thrives in warm, damp conditions, requiring sustenance for survival. Maintaining a clean saddle and avoiding excessive oiling can act as deterrents against mold development.

Avoid storing your saddle in basements, as even finished basements tend to have elevated humidity levels.

For individuals residing in excessively humid regions, providing ample airflow around the saddle is pivotal. Fungi thrive in environments lacking proper oxygen levels.

Refrain from placing a damp saddle pad over your saddle, especially in high humidity zones. This practice can invite trouble.

Addressing mold infestations

Eradicating mold is feasible with the use of white vinegar, a potent fungus and mold eliminator. While diluted alcohol is also an option, it’s more abrasive and could harm the leather’s finish and color.

Following mold removal, allow the leather components to thoroughly air-dry for at least an hour. A well-ventilated area or even a fan’s breeze can expedite the drying process.

Mold despises fresh air. After being treated with white vinegar and exposed to the open air, the mold should perish. With proper storage practices moving forward, mold recurrence can be minimized.

Once the saddle or tack is completely dry, you can proceed with conditioning and polishing. However, avoid applying oil at this stage to prevent nourishing potential new fungal growth.

Prevention is paramount

Dealing with either bloom or mold can be frustrating, as both diminish the aesthetics of the saddle. While bloom isn’t “dirty” like mold, it can still mar the appearance.

To mitigate these issues, adhere to the following guidelines:

  • Store leather tack and saddles in environments between 70 to 75 degrees Fahrenheit.
  • Ensure proper airflow around the saddle.
  • Shield the saddle with a sheet or large pillowcase to ward off dust.

I hold yearly Saddle Care workshops both in person and online as well. 

If you would like to be the first to hear about these sign up!

Posted on Leave a comment

When and How to Shim – The Basics

When and How to Shim, it is a question that has crossed the mind of many riders as they saddle up.

A recent phone call inspired this latest topic:  Shimming using my Correction Pad, but the concepts of shimming are still the same across all brands of pads. 

Rule #1

Shim only as a last resort to fine tune an already well-fitting saddle.  Shimming is not meant to take a saddle that doesn’t fit a horse and make it fit.  

Rule #2

Shim AWAY from pressure, in the hollow spots where there seems to be no pressure or significantly less pressure.  Shimming is also used to help even out a saddle that fits almost everywhere but one or two places. 

Rule #3

Once you start shimming you MUST recheck your saddle fit at least every 30 days to be sure that the shims in those areas are still needed.  As the horse no longer feels pain, they will use those muscles more. They will build up and the shape of their back will change again.  Which is why you need to check your shims and their fit regularly.  At least every 30 days, or shimming could cause more problems than what you started with. 

When I Fit Saddles 

When I arrive at a fitting, the first thing I do after greeting the horse and handler is look and feel the horse’s back and shoulders.  I may even fully palpate the horse to see if there is any readily evident pain to address first.  

Then I like to see the client saddle their horse up, pad and all.  This is so I can see what they have been using and see if and why it is failing for them and their horse.  

Then I have them take it all off and we put just the saddle on without a pad or at the very most a sheet or pillowcase and proceed through the Basic Saddle Fitting process. This process allows us to determine where the areas are that need shimming. 

The Correction Pad system

The system has three sets of shims that can be used with the pad. Fronts, Middles and Rears.  The correction pad is made to order and comes with one set of shims of your choice. Because most of the time a person only needs one set to cover the area that they are trying to even out for their horse.  The other positions can be purchased separately.  

Once you have completed your basic saddle fitting session, you should find only one area that seems to have a gap on one side or both.  My rule of thumb is that if there are more than three areas that need shimming the saddle just doesn’t fit well.  Which means it’s time to look for a saddle to invest in

When Shimming Can’t Help

If the back of the saddle jabs into the loin area due to length and how the horse moves or if the shoulders are too narrow and the saddle just seems to sink over the withers. There are some things that a shim just can’t fix when you’re fitting a non-flexible panel saddle.  

How to Apply the Shims

Now that you have determined that there is only one maybe two spots that seem to have less pressure than the rest when there is weight in the saddle. It’s time to grab the correction pad and place it on the horse’s back. Put the saddle on and lightly girth so that it doesn’t move, but don’t snug it up for riding or work just yet.  Have the helper put weight in the saddle and check again. The pressures you felt before without the pad should still be there even if they are muted by the pad.

You can use tailors or chalkboard chalk to mark your pad where you want to place your shims.  These marks will brush off cordura easily after you place your shims.

When placing your shims ALWAYS start with the largest shim that you will need to fill the gap closest to the horse.  Then layer the smaller shims on top of that in shrinking order so that the smallest one ends up on top closest to the tree of the saddle. 

Have your helper put some weight in the saddle and check under the entire saddle again.  If the pressure appears even all the way around under the saddle with weight in the saddle, it is time to test ride.  So fully cinch or girth up and hit the trail or arena.  Usually, the issues that were there before the shims go away when the horse realizes they aren’t feeling the same discomfort as before. 

My Experiences

At a recent fitting, I saw just this kind of thing.  I had been called because the horse didn’t want to canter and would buck when asked.  It was known that the horse was asymmetrical in the shoulders and likely this was the cause of the issues. 

They knew that I had a pad that might do the trick with the adjustable shims.  I brought over the loaner correction pad that I have. Then we fitted her mare with shims on the shoulder that was smaller.  

My client was eager to give it a try. She hopped on and her mare trotted out freely.  Then OFFERED the canter, no prodding or asking and there was no buck either!  I didn’t know at the time that the mare had done that transition on her own.  Although I could tell by the look on my client’s face that the mare was much more comfortable.  Then did a few more rounds at a lope just because she could. 

I made a custom purple correction pad for her. The look on her face was priceless and the kind of payment money just can’t buy.   Since I was informed later that the first canter transition was the horse’s idea!  That kind of reaction from a horse is just so rewarding. 

Posted on Leave a comment

Design Your Saddle

Are you looking for a saddle that fits both you and your horse perfectly? We understand that finding the right saddle can be a long and sometimes frustrating journey, filled with both disappointment and joy. You may find a saddle that fits your horse well, but after an hour of riding, you’re in so much pain that you can hardly dismount. This is a common struggle I hear about when new clients are looking for a new saddle for both their horses and themselves.  So I’d like to share my process of helping you design your saddle.

Things to Think About

What was your favorite saddle to ride in?

For the purpose of this question it doesn’t matter if it fit your horse.  What matters is whether or not it fit you and what you loved and/or hated about it.  The System X panels are designed to provide fit and comfort for the horse. So here is where I concentrate on helping the rider be as comfortable as their horse will be. 

What saddle did you hate to ride in but it fit that horse?

As people we tend to dwell on the things we didn’t like better than we can recall what we really liked about saddle. Which is why one of the first questions I ask you when helping you design your saddle is what you couldn’t stand about some of the saddles you have ridden in over the years.

What style saddle are you looking for? 

Something with a horn? No horn? An English style saddle? Flapless? Extra Blocking for security? 

Some of this is cosmetic and some is functional, while some is just personal preference.  For the different disciplines there are also requirements for the equipment used.  Dressage is a perfect example of specific requirements for the saddles used in competition. 

These are things to keep in mind, such as what will you be using the saddle for? Will it suit all those needs?

What seat and size is suitable for you?

Like clothing and shoes, saddles will vary in comfort even if they are the same seat size. The rise, waist and twist need to be considered along with the size of the seat. As these things allow a rider to sit centered and balanced.

Considering the size of seat there are thee things to consider, shape, weight and physical limitations of the rider.   Other factors include the build of the rider, their experience level when riding and the discipline that they have chosen.  These factors and others help determine for each individual rider what seat and size is best for them.  

How would you like the cantle finished?

In western saddles there are a variety of ways you can finish a cantle.  Although the most common are either a Cheyenne roll or a pencil roll.  There are some variations that are based off of those two styles, but most fall one way or the other. Some have a cantle where the seat leather just sweeps over and nestles under the seat jockey in the rear.  English and endurance saddles are often this style. 

Weight, is it a factor for you?

None of us are getting any younger, so the weight of the saddle we lift up to our horse’s backs can be a growing factor.  I know many that love their 50 lb saddles but can’t lift them anymore.  While I can’t make my saddle under 16.5lbs because of the solid wood tree and the System X panels. 

The weight of the saddle is a factor for many riders, and we’ll work with you to reduce the weight while still maintaining the quality and comfort of the saddle. Working closely with you throughout designing your saddle, ensuring that your vision comes to life in the way you imagined. We want to make sure that you’re not only happy with the saddle we build for you but also supported as you learn to use it and make all the necessary adjustments as you ride multiple horses.

The Experience

When you choose to design your forever saddle with us, it’ll be more than just the color of leather, style of saddle, and choice of tree. Discussing any physical limitations you have and any future plans you may have in your riding career. Let’s talk about your new saddle and start the process of building your custom forever saddle.

Posted on Leave a comment

The Liberty

The Liberty a model of Evolutionary Saddle is constructed very similarly to your traditional saddles, except for the panels.  

In many ways the Evolutionary saddle is easier to construct than all of your traditional saddles, which is what makes it so customizable for the rider.  The panels will fit the horse, so much of the construction is centered around rider comfort.

For instance this saddle has a soft seat with a narrow twist and waist then gradual rise. This is a popular style seat for many women that trail ride. The seat is designed and sculpted to provide a balanced comfortable ride for hours in the saddle.

This saddle was made with a pencil roll or what has been called in the past a regular roll. This style makes the cantle taller and brings with it a secure feeling for the rider. This is a full soft seat that actually shrinks a seat size by about a 1/2″. I have a similar seat style that doesn’t rob the rider of that room in the rear but will still provide a comfortable ride, I call it the Hybrid Soft Seat.

Here is a glimpse into how The Liberty, an Evolutionary Saddle, is constructed!

Posted on 5 Comments

De-Dazzle Saddle Contest! – WE HAVE A WINNER!!

Recently we were brought a saddle for cleaning and what we have come to call de-dazzling.  It inspired the De-Dazzle Saddle Contest! I know that there are some saddle makers that will do this per a customers request.  This was a DIY job that I thought was going to be a disaster and it turned out far better than we could have imagined. 

Before De-Dazzling

As you can see this silver was covered and hadn’t been polished in some time. As we took off the dazzles we collected them. Granted some went flying across the shop as they were popped off, but I can assure you that we attempted to get them all in the jar as we went. One of my neighbors even crawled around a bit on the floor to find any strays we missed.

So we got them all off, there was a lot of glue. At first we thought that the plating of the silver has started to wear and that is why they dazzled it. But after taking an hour, a q-tip, some acetone and a polishing cloth it was discovered that the silver was in great shape!

Partially De-Dazzled

The Final Shine

Finally when all the glue and dazzles were off, the polishing commenced. We were left with a blindingly shiny saddle that the pictures do not do it justice. Mirror like shine.

The Contest

The De-dazzle Saddle is a Dale Chavez Show saddle that was custom made when it was first built. It has its original silver which was in great shape and shined up beautifully. I just wish I had a photo booth that would have done it some justice. You really could see yourself in it.

In the comments section of this page put in your answer to the question. How many gems are in the jar?

The contest will run from the day this is posted until May 20th, 2023. When a winner will be declared closest to the number in the jar without going over!

There will be one winner declared who will receive a Grooming Zippered Carry-All that can be used for much more than just grooming supplies! Also included is one of our Hand-Held Flow-Through Body Brush- DELUXE that you can screw on the end of a hose! I’m also going toss in our Trail Bells. You can tie them onto any saddle or backpack to notify the wildlife around you! This prize has a value of over $40!!

AND THE WINNER IS!!!!

Michelle Ellis!!!! You were the closest without going over… Although you were shy by more than a few.

The number of gems that were on that saddle that made it into that jars was 1,079 GEMS!!!

Thank you to everyone for participating!!

Posted on Leave a comment

Puddles – Bottomless Pits?

country lane field meadow puddles

Puddles – I finally understand why horses see them as bottomless pits!

Hopping puddles when riding a horse is annoying! I have a horse that was my regular riding horse that refused to put a single hoof in a puddle. I learned why on this particular road trip in July of 2020.

The road trip…

So let’s set the scene, an ATV trail being called a road on Google Maps.  Fully loaded 2012 Subaru Outback with one of those hitch racks to carry a cooler.  Two capable women and one large dog loaded for a two week vacation on a lake disconnected from the world. 

My riding companion, Sandy and I were traveling to my family’s cottage in Lower Michigan. At the time I was in my previous career and was visiting the remote locations in the Upper Peninsula that I serviced.  Performing the yearly checks to make sure things are running smoothly.

Rerouting…

Following the GPS, as some of you know the upper peninsula of Michigan has sketchy service at best in many areas. Then missing the turn and of course my GPS rerouted me. 

I should have known that when the dirt trail turned into something akin to an ATV trail I should have just started backing up.  As a ‘forward’ kind of person I kept going. 

Being a forward kind of person…

As this driveway turns into a forest trail, then into sand dunes, next were the pot holes. WOW, more like pits of doom getting ready to swallow us up when we were already where AAA would never get to us. 

The point at which it was decided that we were going to turn around we had just come through a puddle that was as black and opaque as ink and it was sketchy.  The next puddle was as long as the car and looked about as deep as the car was tall, again inky black water stood stagnant in it.  That puddle looked for sure like it was bottomless.

Now I get it!

Both Sandy and I assessed it, this was the moment that we both realized why horses hate puddles.  There was no way anyone was going to get me to drive in there. I would back all the way back out to the highway if I had to.  ALL. THE. WAY. 

I understood at that moment, why a horse can and will refuse to step in a puddle but will go swimming in a lake or pond.  That looked like a bottomless pit and who knows what was at the bottom if there was one! Some is the horse’s trust in you not to put them in a situation that will hurt you both, but also them making a decision to do the same for you both at the same time.  Either way it is a decision I respect now.

Leaving the Puddles behind!

I only had to back up a few yards before I could turn around completely.  Getting out of there was as hair raising as getting in there going over each obstacle wondering how we got that far to begin with.  I learned a couple valuable lessons, don’t trust the GPS in the UP of Michigan and puddles really are a scary thing.

Posted on Leave a comment

Camping Must-Have Items for Horse Owners

Camping with your horse can be an enjoyable experience, but it’s important to remember to be prepared. In this article, we’ll cover these camping must-have items that you need to ensure a safe and comfortable trip with your horse.

The Camping Must-Have Items

  1. Conduct a Pre-Trip Check: To avoid complications on the road, make sure to conduct a preflight check on your truck and trailer. This includes ensuring that they are in working order, tires are aired up and ready to go.
  2. Know Your Horse: Bring a cooler or light blanket for your horse in case they get chilly at night. Traveling can be stressful, so it’s important to bring something comforting for your horse. Also, remember to bring food and drink for both you and your horse. Including electrolyte packets to entice your horse to drink unfamiliar water.
  3. Plan for Accommodations: Know where your horse will spend the night and bring your own fencing if necessary. Even if corrals are provided, it’s always a good idea to have a backup plan in case of conflict.
  4. Basic First Aid: Bring a first aid kit for you and your horse to be prepared for any injuries or accidents.
  5. Plan Your Route: Plan your route on a computer or larger screen to avoid any potential traffic issues and to stay aware of the progress of your trip.
  6. Leave on Time: Plan your departure to avoid heavy traffic during rush hour and ensure a smoother trip.

Remember that the most important thing is to have fun and relax! Camping with your horse should be an enjoyable experience, so don’t stress about the details. Focus on the essentials, like those camping must-have items listed above, and have a great time exploring the great outdoors with your equine companion!

Here is a list of places that I have camped at!

Want to talk about the experiences I have had there? Set up a free consultation!

Posted on Leave a comment

Saddle Fitting Philosophy

The first Minimalist

Saddle fitting is a crucial part of riding that takes into account many variables, from the shape of the horse to the fitness level of both horse and rider. Our philosophy at Evolutionary Saddles, we believe saddle fitting is both an art and a science. Using a combination of knowledge, experience, and the latest technology to create saddles that fit both horse and rider comfortably.

The horse has to carry the live weight of a rider who is as unpredictable as the horse in how they move their bodies.   Then you add the rider’s weight, their fitness level that same saddle could now have severe pressure areas.  Because the saddle itself is positioning the rider poorly due to their physical limitations or structure. 

Our Philosophy

Our philosophy on saddle fitting is rooted in the belief that there are an infinite number of shapes that comprise the horse. The same can be said for the varying shapes and weights of the humans that ride them. All of these factors are critical in saddle fit. A poorly fitted saddle can lead to severe pressure areas. Causing the horse and rider discomfort and pain.

Addressing the Issues

To address these issues, we have designed a saddle that moves and flexes with the horse. Allowing for a more comfortable fit for the horse. We take into account the rider’s build, physical limitations, and comfort, because a comfortable rider can ride better and longer.

When saddle fitting, we start with the rider, ensuring they can sit comfortably, centered, and balanced. We also consider the twist, waist, rise, and cantle height, ensuring the saddle fits appropriately for each rider’s preferences. Then fitting the saddle with the rider in it, making any necessary adjustments to the rigging and placement. Sometimes the use of shims is necessary to balance the saddle appropriately on the horse.

Shims may be necessary in some rare instances, we do not rely on them and use them only when necessary. Understanding that saddle fitting is a combination of art and science. Evolutionary saddles fit a wide range of horses. Which is why we take the time to ensure each saddle is fitted to both horse and rider.

Learn More!

Saddle fitting is an essential part of riding, and we take it seriously at Evolutionary Saddles. If you want to learn more about the basics of saddle fitting. Pick up our free guide that outlines the steps we take when fitting a horse, rider, and saddle. Sign up for our email list to receive your free guide today.

Posted on Leave a comment

Maintaining Your Panel Saddle

Maintaining a panel saddle

Why Regular Checks Are Important

Panel saddles are designed with moving parts that can wear out over time, especially if you use your saddle frequently or if you are a heavier rider. Maintaining your panel saddle to keep it in good working order, it’s important to perform regular checks and maintenance. Here’s what you need to know:

Check Your Saddle at Least Once a Year

Every saddle owner should inspect their saddle at least once a year, regardless of the type of saddle they own. If you ride more than 300 miles a year, it’s a good idea to check your panels and saddles about every 300 miles.

How to Perform a Panel Check

To check your saddle, flip it over on a saddle stand and remove its socks. Pull the panels up from the middle and take note of how loose they may be, if they are moving freely or if they are ‘sticky’ in their movement. If you notice any issues with your panels, such as side-to-side play, it’s important to contact Evolutionary Saddles as soon as possible.

After checking the movement of the panels, you will need to tip the saddle on its side to view the thrust bushings that look like washers between the panel and the mount that is in the saddle tree. Make sure the bushings are there.  If you don’t see those thrust bushings (washers) on each mount then you need to call me ASAP!  Then put only one drop of 3-in-1 household oil in between each mount and bushing.

The Tree

Never perform a tree check on a flexible panel saddle like you would a conventional saddle.  The conventional way of testing the tree itself for issues cannot be performed the same way as conventional saddles.  To perform a tree check on an Evolutionary saddle you are going to need a stair or step that you can use so that you can have the panels hang off the side of the stair so only the wood tree is taking any pressure that is put on it.  If you do it any other way, you will damage your panels.

Most tree issues on Evolutionary Saddles will be very readily apparent, because there is no rawhide holding things together as many of your very heavy western saddles have.  Which is why a tree check is so important for conventional western saddles. 

Ready to Ride!

Performing regular panel maintenance checks every 300 miles will keep your saddle in perfect working order.  It will keep your horse from dealing with poorly moving parts due to a missing thrust bushing (washer) or too much movement in the rear of the panel.  Saddle up! It’s time to go riding!!

Posted on

My Endurance Journey 2023

Like many others I made a New Year’s Resolution. I guess it could just be considered a goal for this year with a new horse in a new sport. My desire to try the sport of Endurance Riding has been brewing for a couple of decades. Until recently, I never knew where to start.

Last year at my first Saddle Care Workshop, I met my first endurance rider that I was able to talk to. It was a treat and a blessing that has caused us to become friends and for her to become a mentor.

Last weekend was a beautiful summer day in the middle of April when the temps should be closer to 50 than to 80. We were all able to get together at a local trail to learn what are the basics of Endurance Riding.

So what does that mean?

Trust me I was asking the same question. At every endurance race there is a ride meeting that is held before the event starts. Every rider must attend and if you don’t it could be at your own peril. Since there are things that are discussed at those meetings that are not mentioned anywhere else in the ride paperwork.

Vet Checks

There is also vet checks about every 12 to 15 miles on endurance races and competitive trail. During these stops you have to trot or gait out your horse. Depending on the kind of race you are competing in will determine the pattern. For the Limited Distance that I am conditioning for. I practiced trotting Gracie down and back on a loose lead and straight at the person standing in as the vet. This particular thing Gracie and I do pretty well already, although she didn’t trot off like we do at home, she did it easily.

Trail Markings

Finally, trail markings! This is probably the single most important reason you must make sure you attend the ride meeting. Where they tell you how the flags work and which ones are which. Then how they will be placed so you know you’re going the right way or not. VERY IMPORTANT! Apparently there are some that are almost experts at getting lost even when they attend the meetings. Which solidified for me the importance of attending at all costs.

Ready to Ride

After learning how important these first things were, we tacked up and got ready to ride. I have to admit that I have not had that many rides on Gracie since she arrived. Between her feet issues at first, then we were running out of summer and fall. Winter has given her more time to slowly lose the extra weight she has been carrying most of her life. Now we can start out with good feet under us, less weight to condition off and a bright summer ahead!

I was supposed to ride with an experienced endurance rider. Unfortunately there weren’t enough of them there with horses to ride with us. So, my long time riding partner Sandy with her beautiful mare Cricket were our riding partners for the day. Which was probably a good thing because these two girls were HOT. We struggled for a walk the entire time. Then out of frustration I am pretty sure that Gracie humped her back at me at one point.

Which all adds up to a really fun riding day!

I was able to try out the new Stratford saddle that made just for this adventure this summer. The Stratford is for sale, an 18.5″ seat, built on the dressage tree. I have a pair of slim leather with double T-pieces for easy change and adjustment even from the saddle. Then I put a pair of leather covered endurance stirrups that I had on hand. I might change to stirrup irons as I haven’t quite decided if I like these stirrups or not yet.

If you would like to try out a saddle on your horse and you live with in a couple of hours of Stratford, Wisconsin schedule a call with me so we can talk about where and when.